PurpleSteph’s Blog

Just another WordPress.com weblog

Star of Bethlehem – free Christmassy pattern! December 20, 2009

I designed this simple geometric star for the BaaRamEwe Christmas window display, a Jean Greenhowe knitted nativity set made by the BaaRamEwe knit night crew.

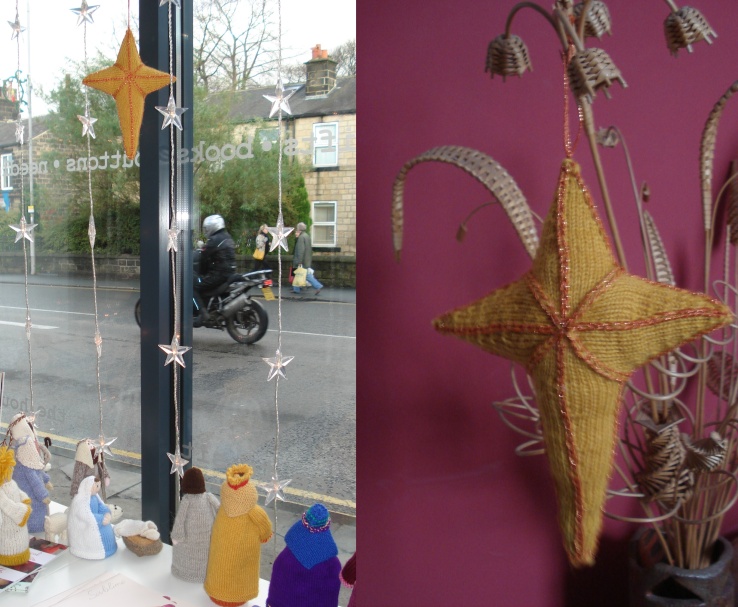
Star of Bethlehem decoration

In keeping with the shop theme (Yorkshire yarns and British breeds), I’ve used pure Blue-faced Leicester DK for the star and Twilleys Goldfingering for the optional embellishment. You could substitute for almost any yarn, just remember that as with any stuffed item you’ll need a needle size a little smaller than usual so the fabric is nice and dense. I used a circular needle, or dpns would work, especially for the fiddly bits at the centre front and back of the star.

The star looks great as a hanging ornament, or with a little adaptation it could be made into a tree-topper.

Star of Bethlehem:

Materials:

British Breeds Yarns Blue Faced Leicester Double Knitting, shade 629 (yellow), 1 ball.

Twilleys of Stamford Goldfingering, shade 64 (orange), 1 ball.

3.25mm circular needle, 60cm or longer.

Stitch markers (optional).

Needle.

Toy stuffing.

Abbreviations:

k = knit

p = purl

kfb = knit into front and back of the same stitch

sl = slip next stitch with yarn at the back of the work – all slipped stitches are worked purlwise unless otherwise stated

k2tog = knit 2 stitches together

triple dec = slip 2 stitches together as if to k2tog, knit next stitch through the back of the loop, then pass the slipped stitches over (2 stitches decreased)

Instructions:

Small Point  (make 3)

Cast on 4 stitches and slip them to the other end of the needle. Start knitting the next row from the first cast on stitch as if making an i-cord.

Round 1: place marker if required to mark start of round.  kfb, repeat to end of round (8 stitches).

Round 2: [sl, k] to end of round.

Round 3: k all.

Round 4: [sl, k] to end of round.

Round 5: [k, kfb] to end of round (12 stitches).

Round 6: [sl, k2] to end of round.

Round 7: k all.

Round 8: [sl, k2] to end of round.

Round 9: [k2, kfb] to end of round (16 stitches).

Round 10: [sl, k3] to end of round.

Round 11: k all.

Round 12: [sl, k3] to end of round.

Round 13: [k3, kfb] to end of round (20 stitches).

Round 14: [sl, k4] to end of round.

Round 15: k all.

Round 16: [sl, k4] to end of round.

Round 17: [k4, kfb] to end of round (24 stitches).

Round 18: [sl, k5] to end of round.

Round 19: k all.

Round 20: [sl, k5] to end of round.

Round 21: [k5, kfb] to end of round (28 stitches).

Round 22: [sl, k6] to end of round.

Round 23: k all.

Round 24: [sl, k6] to end of round.

Round 25: [k6, kfb] to end of round (32 stitches).

Round 26: [sl, k7] to end of round.

Round 27: k all.

Round 28: [sl, k7] to end of round.

Break yarn and thread stitches onto waste yarn.

Large Point (make 1)

Rounds 1-8: Same as on Small Points (12 stitches).

Round 9: k all.

Round 10: [sl, k2] to end of round.

Rounds 11-12: repeat Rounds 9-10.

Round 13: [k2, kfb] to end of round (16 stitches).

Round 14: [sl, k3] to end of round.

Round 15: k all.

Rounds 16-19: repeat Rounds 14-15 twice.

Round 20: [sl, k3] to end of round.

Round 21: [k3, kfb] to end of round (20 stitches).

Round 22: [sl, k4] to end of round.

Round 23: k all.

Rounds 24-27: repeat Rounds 22-23 twice.

Round 28: [sl, k4] to end of round.

Round 29: [k4, kfb] to end of round (24 stitches).

Round 30: [sl, k5] to end of round.

Round 31: k all.

Rounds 32-25: repeat Rounds 30-31 twice.

Round 36: [sl, k5] to end of round.

Round 37: [k5, kfb] to end of round (28 stitches).

Round 38: [sl, k6] to end of round.

Round 39: k all.

Rounds 40-43: repeat Rounds 38-39 twice.

Round 44: [sl, k6] to end of round.

Round 45: [k6, kfb] to end of round (32 stitches).

Round 46: [sl, k7] to end of round.

Round 47: k all.

Rounds 48-51: repeat Rounds 46-47 twice.

Round 52: [sl, k7] to end of round.

Thread the last 15 stitches worked onto waste yarn without breaking the working yarn.

Centre 1 (can be either back or front):

Assemble points of star as follows:

Working across the Large Point, sl first stitch, ** k15, sl next stitch knitwise.

Take one of the Small Points, and slide 17 stitches onto your left needle point, starting and ending with one of the slipped (corner) stitches of the points. Sl first stitch knitwise, then insert left needle point into the front of the first 2 stitches on the right needle and knit them together. **

Repeat from ** to ** 3 more times. The final time you will be joining the 3rd Small Point back to the Large Point (64 stitches in round). K7 to the new start of the round – place marker if necessary to mark new start of round.

Round 1: [sl, k6, triple dec, k6] to end of round (56 stitches).

Round 2: k all.

Round 3: [sl, k5, triple dec, k5] to end of round (48 stitches).

Round 4: k all.

Round 5: [sl, k4, triple dec, k4] to end of round (40 stitches).

Round 6: k all.

Round 7: [sl, k3, triple dec, k3] to end of round (32 stitches).

Round 8: [k3, triple dec, k2] to end of round (24 stitches).

Round 9: [sl, k1, triple dec, k1] to end of round (16 stitches).

Round 10: [k1, triple dec] to end of round (8 stitches).

Break yarn and thread through the final 8 stitches. Secure yarn on wrong side of work and darn in yarn ends from points. Part stuff each point.

Centre 2:

Cut waste yarn lengths and work remaining stitches from points as follows, starting with the centre (slipped) stitch on any point:

[k8, pick up 2 stitches between points and knit together, k7] to end of round (64 stitches).

Repeat from Round 1 of Centre 1, adding small amounts of stuffing as you go and ensuring the star is fully stuffed before the centre hole gets too small.

Secure any remaining yarn ends and hide on the inside.

Optional embellishment:

Using sparkly thread and duplicate stitch (Swiss darning), oversew the outline of the star, the centre stitches of each point on both sides, and the diagonals on both sides (basically every place you were slipping stitches or decreasing while knitting).

Make a loop of plaited, twisted or crocheted thread at the top point of the star (opposite the Large Point!). Display, and enjoy.

{Puzzle – starting from a point of the star, with an extremely long thread it would be possible to do all the oversewing in 1 continuous line. Can you work out how?}
 

BaaRamEwe just got better… November 26, 2009

Filed under: General yarniness — purplesteph @ 2:01 pm
Tags: , , ,

The best little yarn shop in Leeds just got better:

Ace designer Ysolda Teague opened the new workshop room at BaaRamEwe in Headingley last Thursday, and signed copies of the marvellous Whimsical Little Knits 2.  (Pandop, is it Christmas yet? What about now? Or now?)

See here for further photos, including a couple of the many Ishbels worn or brought along to the event (I counted at least 7), and evidence suggesting that it isn’t possible to take an unflattering photo of Ysolda, but it is definitely possible to take a very bad picture of me, particularly when I’m pulling a funny face, sipping wine and trying on a marigold yellow hat (the one seen in the background of the picture above). Oh well.

While my blog has been shockingly neglected of late, there may be some new entries coming up soon – I have no less than 4 designs in progress, of which 2 are almost ready to publish. And 1 of them isn’t even for socks! Also, in a case of necessity being the mother of invention, I’ve worked out a way to do a provisional (crochet) cast on with no crochet hook, just hands and a knitting needle. So that will be blogged as soon as I find a way to take a photo of my own hands.


Ankh Morpork Guild of Assassins: Pointy Stick Case – Free Knitting Pattern August 30, 2009

What does every good knitter need? Yarn, good light, yarn, friends and relatives who value hand-knitted gifts, yarn, storage space, yarn, needles, yarn…  What does every good Discworld Assassin need?  Aristocratic birth, good contacts, climbing ability, ruthlessness, black clothing of the highest quality, plenty of concealed weapons…  Ah! Assassins carry thin pointy objects around with them at all times, so do knitters. Bingo.

This pointy stick case was created for the Ankh Morpork Knitter’s Guild swap on Ravelry in 2009.  I entered as an Alchemist, my swap partner is an Assassin.  If you choose to keep anything other than knitting needles in it, that is entirely your affair and I shall not be held liable for the consequences.

Assassin’s Pointy Stick Case – Knitting Pattern

The case has a linen stitch body and faux-smocked border, creating a densely textured fabric. The design on the flap is the alchemical symbol for Night – this pattern is charted.

The pattern can be easily adapted for different yarn and a wider or narrower case, although a different charted pattern may need to be substituted if you are changing stitch numbers. As long as you cast on an odd number of stitches initially, you will be able to work the faux-smocking by increasing 1 stitch as you finish the linen stitch section.

You will need:

Black DK yarn (any, as long as it’s a matt black – Assassins don’t want to carry anything shiny that might give them away)

3mm circular needle & 2.5mm dpns (for cast-on & setup)

3.5mm circular needle

Cable needle (optional)

1m black ribbon, width 1.5 inches

Embroidery needle

Pins

Black thread

Abbreviations:

k = knit

p = purl

kfb = knit into front and back of stitch

swyif = slip next stitch with yarn in front of work

sl = slip next stitch with yarn behind work

yf = bring yarn to the front of the work

yb = bring yarn to the back of the work

k2tog = knit 2 together

ktbl = knit through back looop

Pattern:

Setup:

Using a 3mm circular needle, cast on 16 stitches.

Row 1: kfb 15 times, k1 (31 stitches). Slide stitches to the other end of the needle.

Using 2 double pointed needles held parallel, rearrange stitches, starting with the needle further away from you and alternating them between the 2 needles. IE 1st stitch goes to back needle, 2nd stitch to front needle, 3rd stitch to back needle, 4th stitch to front needle, etc. When all stitches are transferred you should have 15 stitches on the front needle (Needle 1 from now on) and 16 stitches on the back needle (Needle 2).

Body:

Using a 3.5mm circular needle, work linen stitch in the round as follows:

Round 2: [k, swyif] to last stitch in round, k

Round 3: [swyif, k] to last stitch, swyif

Repeat these 2 rounds until case is approximately 4 inches shorter than the total length of the knitting needles it will eventually contain.

Setup round for faux-smocking: kfb, k to end of ro (32 stitches)

Border:

To create the smocking effect, work the following rounds 1-8 twice, then rounds 1-6 once.

Rounds 1-3: [p, k] to end of round

Round 4: [p, {sl3, yf, sl same 3 stitches back to left needle tip, yb} twice, k, p, k] to end of round

Rounds 5-7: [p, k] to end of round

Round 8: p, k, move these 2 stitches onto Needle 2, and 2 stitches from other end of Needle 2 onto Needle 1 so that 16 stitches are on each needle still. Then work as for Round 4. When you next work rounds 1-3 you will need to rearrange stitches back to the original needles so that the gathered stitches for Round 4 will occur in the correct places.

Setup for Flap:

k, move this stitch to Needle 2. Cast off next 14 stitches – do not cast off in rib as this would make the edge less smooth. 18 stitches remain, these will be worked back and forth for the flap.

Flap:

Work in stocking stitch, slipping the final stitch of every row with the yarn on the wrong side of the work. Measure your work against the knitting needles to go in the case, and start chart when the flap is long enough to bend around the needle ends.

Chart:

This chart shows the Alchemical symbol for Night. If using the chart on another project you may need to turn it upside down - the bottom of the chart is for the top of the symbol as on this pattern you are knitting down from the top of the flap.

This chart shows the Alchemical symbol for 'Night'. If using the chart on another project you may need to turn it upside down - the bottom of the chart is for the top of the symbol as on this pattern you are knitting down from the top of the flap.

After working chart, finish as follows:

Next Row (wrong side): p2, k2tog, [p, k] to last 2 stitches, p, slwyif.

Final Row: k2, [p, k] to last stitch, slwyb

Cast off purlwise.

Break yarn and weave in ends.

Lining:

Turn the needle case inside out. Take one end of the ribbon and fold about 5mm to make a hem. Pin the folded end of ribbon to the inside of the stitches you cast off before starting the flap (the front of the case). Lay the ribbon out flat down the front of the case, and fold over on itself at the cast on stitches, so that there are 2 layers of ribbon on top of the case (see diagram).

Pointy-Stick Case - Lining Diagram

Pointy-Stick Case - Lining Diagram

Pin the ribbon to the case securely and cut off any excess length, leaving about 1cm for the back hem.  Oversew the sides of the ribbon to the sides of the case, the lower fold to the cast on stitches, and the upper hem to the cast off stitches, using black thread. I found it helpful to insert a ruler into the case while doing this, to make sure I only sewed through one layer of knitted fabric.

When you have attached the ribbon, turn the case back inside-out (or should that be outside-in, or maybe inside-in?). The ribbon will now be enclosed inside the case. Fold the cut end of the ribbon between the ribbon pocket and the back of the needle case so that it is hidden, then sew along the fold.  Take a little time to make sure that the corners of the lining are securely anchored to both the front and back of the case, as most wear will occur here.

Ta-da!


Multi-tasking July 5, 2009

Filed under: Dyeing,General yarniness — purplesteph @ 4:07 pm

So, I haven’t blogged for ages. More because of too much stuff happening to blog about than too little. Not that that’s something I complain about, by the way.

But it does leave me wondering why I so frequently spend my free time multi-tasking – for example at the same time as I am flinging words at random in the direction of my blog, I am also watching a DVD, composing a mystery pattern for a swap (full details will be on a future blog), re-doing 2 rows of my Ishbel to sort out an error (thank God for lifelines)… oh, and my first attempt at natural dyeing is merrily cooking to itself in the microwave. The sofa beside me is littered with needles and part-finished projects.

Why do I do this? Do I really have that short an attention span? Possibly. Do I risk making mistakes because I rarely give my full attention to one thing at a time? Almost certainly, especially on row counts. Is it more fun this way?  Definitely.

Anyway, enough about me. Look at the pretty picture!

And there are more in my Flickr photostream – go on, look!


Sadie: a sweet and simple cabled sock. Free pattern! May 3, 2009

You know you’re an addicted knitter when…

…someone hands you a cute baby to hold and you just stare at the stitch pattern on her cute hand-knit hoodie.

The baby’s name is Sadie, the hoodie has now been outgrown, but the stitch pattern lives on, memorised, reconstructed, reinterpreted, and finally turned into socks.

These socks are constructed toe up, with a reversed heel-flap-and-gusset heel. A little simple calculation is required to work this heel, but it’s not scary, honest! Garter stitch inserts fill the centre of the cable twists, which are themselves framed by purl rounds. At the cuff, the cables merge smoothly into the unusual 7 stitch ribbing.

The pattern is written for 2 circular needles, but dpns or Magic Loop can easily be substituted if preferred. I have included a chart, as well as full written instructions for the stitch pattern.

Sadie Socks

Yarn: 90% fine alpaca, 10% cotton sock yarn (4 ply) from DT Craft and Design 100g (approx 350m).

(Or substitute any solid or semi-solid sock yarn of your choice, as long as gauge matches.)

This yarn is exceptionally soft, and requires some care to work with as it is quite loosely plied. But it easily repays the attention, forming a strong and supple fabric with a slight ‘halo’ and showing the stitch pattern beautifully.

Yarn dyed using Kool-Aid.

Needles: 2 x 2.5mm circular needles.

Gauge: 28 stitches x 20 rows = 10cm, over pattern using 2.5mm needles.

Finished Sizing: Fits a foot with diameter 23cm at widest part of the foot. Finished len

gth of foot is 23.5cm, length of leg is 22cm (measured in both cases from point of heel). For a wider foot or longer socks, you are likely to need a second skein of yarn.

Special Techniques: Figure of 8 cast on. Cabling without a cable needle (optional, but saves a whole lot of time) – I’ve attempted various methods, this tutorial looks like the simplest method over 2 stitches.

Abbreviations used in Pattern:

k = knit

p = purl

sl1 = slip next stitch purlwise

k1b = knit through the back of the loop

kfb = knit into front and back of the stitch

pfb = purl into front and back of the stitch

c2f = slip 1 stitch onto a cable needle held at the front of the work, knit next stitch from lef

t needle, knit stitch from the cable needle. (Or twist these 2 stitches as per the video tutorial linked above).

c2b = slip 1 stitch onto a cable needle held at the back of the work, knit next stitch from left needle, knit stitch from the cable needle. (Or twist these 2 stitches as per the video tutorial linked above).

w&t = wrap and turn. Slip next stitch purlwise, bring yarn between needles, slip stitch back so that the yarn has been wrapped around it. Turn work.

k2tog = knit next 2 stitches together

ssk = slip next 2 stitches separately knitwise, insert left needle tip into front of both stitches, and knit them together

p2tog = purl next 2 stitches together

Chart:

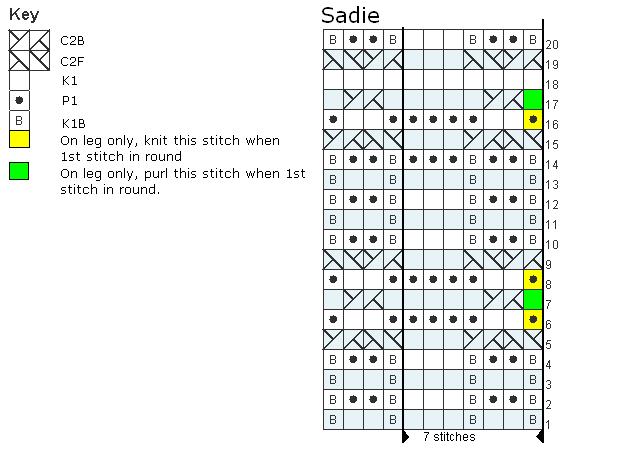
Sadie Stitch chart.

For foot, work stitch repeat 4 times, then the remaining 4 stitches. For leg, work stitch repeat 9 times, paying attention to the highlighted stitches on the first stitch of the relevant rounds. Chart created using Jacquie's Knitting Chart Maker (http://jacquie.typepad.com/Charts/knitChart.htm)

Sock ImagesPattern Stitch: (over 7 stitches and 20 rows). Final 4 stitches after the pattern repeat are for the foot only.
Row 1: [k1b, k2, k1b, k3], k1b, k2, k1b

Row 2: [k1b, p2, k1b, k3], k1b, p2, k1b

Rows 3-4: As rows 1-2

Row 5: [c2f, c2b, k3], c2f, c2b

Row 6: [p1, k2, p4], p1, k2, p1

Row 7: [k1, c2b, k4], k1, c2b, k1

Row 8: As row 6

Row 9: [c2b, c2f, k3], c2b, c2f

Row 10: As row 2

Rows 11-13: As rows 1-3

Row 14:  [k1b, p2, k1b, p3], k1b, p2, k1b

Rows 15-17: As rows 5-7

Row 18: k7

Rows 19-20: As rows 9-10.

Instructions:

Toe:

Using the figure of 8 method, cast on 8 stitches onto each of 2 circular needles (16 stitches). Knit 1 round on these stitches.

Increase Round: kfb, k till 2 stitches remain on Needle 1, kfb, k. Repeat on Needle 2. (20 stitches).

Work this round 3 more times (32 stitches).

Knit next round, then work Increase Round (36 stitches).

Work these 2 rounds 6 more times (60 stitches).

K next round, then work the Increase Round omitting one kfb on Needle 2. (63 stitches). You should have 32 stitches on Needle 1 (multiple of 7 + 4) and 31 stitches on Needle 2 (multiple of 7 + 3). K 1 round.

Foot:

Set up for foot pattern: Needle 1, [k1b, p2, k1b, k3] till 4 stitches remain on Needle 1, k1b, p2, k1b.

Work in stocking stitch over Needle 2 for whole of foot

Next round: start working foot pattern from chart, or follow written instructions for stitch pattern. Pattern repeats 4 times + 4 stitches over the top of the foot.

Continue as set until foot is 2 inches shorter than the desired length. (In my case, this was after 3 pattern repeats).

Gusset:

For the gusset, continue pattern over Needle 1, while increasing on alternate rounds on Needle 2 as follows: kfb, k until 2 stitches remain on Needle, kfb, k.  Continue until there are 47 stitches on Needle 2.

These stitches will be divided up as follows: 15 side stitches (Side 1), 17 cap stitches, 15 side stitches (Side 2).

If you are working the sole over a different number of stitches, see footnote for instructions on calculating the number of heel stitches you need.

Heel Cap:

K across the 15 stitches for Side 1. Slide these stitches onto Needle 1 or a piece of waste yarn while you work the heel cap. From the other end of Needle 2, slide the 15 stitches for Side 2 onto Needle 1 or a piece of waste yarn. Work heel cap over the remaining 17 central stitches only.

Row 1:  k, kfb, k until 2 stitches remain, w&t

Row 2: sl1, pfb, p until 2 stitches remain, w&t

Row 3: sl1, kfb, k until 3 stitches remain, w&t

Row 4: sl1, pfb, p until 3 stitches remain, w&t

Row5: sl1, kfb, k until 4 stitches remain, w&t

Row 6: sl1, pfb, p until 4 stitches remain, w&t

Continue as set, leaving 1 more stitch unworked at the end of the row each time, until the total number of stitches in the heel cap equals the orignal number of stitches in the sole of the foot – in this case, 31 stitches.

Next Row:  sl1, k across until 1 stitch remains on left needle, picking up wraps as you go – when you reach a wrapped stitch, slip it knitwise, then pick up the wrap with the point of the left needle. Slip the wrap knitwise, then insert the left needle point into the front of both the stitch and its wrap, and knit them together. Slide the 15 stitches for Side 2 back onto Needle 2 from the other needle or waste yarn. Ssk the last heel cap stitch and first side stitch. Turn work.

Next Row: sl1, p across until 1 stitch remains on left needle, picking up remaining wraps as you go – when you reach a wrapped stitch, slip it purlwise, then pick up the wrap with the point of the left needle. Slip the wrapped stitch back to the left needle, then p2tog with the stitch and its wrap. Slide the 15 stitches for Side 1 back onto Needle 2 from the other needle or waste yarn. P2tog the last heel cap stitch and first side stitch. Turn work.

Heel Flap:

Row 1: [sl1, k1] to last heel cap stitch, ssk with next side stitch, turn.

Row 2: p to last heel cap stitch, p2tog with next side stitch, turn.

Repeat these 2 rows until all side stitches have been incorporated into the heel flap. 31 stitches remain on Needle 2. Final Row: sl1, k across all remaining stitches on Needle 2.

Leg:

Work stitch pattern over all stitches on round until desired length is reached. (I did 3 pattern repeats here). If you are following the chart, take note of the highlighted stitches on rounds 6, 7, 8, 16, and 17. If you are not using the chart, you will need to do the following on these rows, at the beginning of the round only: rounds 6, 8 and 16: knit first stitch; rounds 7 and 17, purl first stitch. This will prevent a ‘jog’ at the start of the round.

Finish the leg pattern on round 3 or 13 of the pattern, to have a smooth transition to the ribbing on the cuff:

Cuff:

Ribbing pattern: [k1b, p2, k1b, p, k1b, p] repeat to end of round.

Work 15 rounds of ribbing, then cast off loosely in rib.

=================================================================================

*If you work this heel over a different number of stitches, here’s how to do the maths:

Firstly, decide how many rows you will want in your heel flap – 30 is a good number, but you may know that you need more. Also, calculate how many stitches you want for the cap of the heel as follows:

Take the number of sole stitches (before increasing) on Needle 2, and halve it.

  • If the total is an odd number and a half, add 1.5 to it. IE 31 sole stitches, halves to 15.5, + 1.5 = 17.
  • If the total is an even number and a half, add 2.5 to it. IE 33 sole stitches, halves to 16.5, +1.5 = 19.
  • If the total is an even number, add 2 to it. IE 32 sole stitches, halves to 16, + 2 = 18.
  • If the total is an odd number, add 3 to it. IE 30 sole stitches, halves to 15, +3 = 18.

The resulting number is how many stitches you will need to start the heel cap.

The total number of stitches you will need on Needle 2 after completing the gusset increases will be [heelflap stitches] + [heel cap stitches].

=================================================================================

Copyright Purplesteph 2009.

Please do: Use this pattern and tell other people about it.

Please don’t: Sell this pattern or completed items made using the pattern.


I am quite clearly a muppet

When in November it suddenly and inexplicably seemed like a good idea to attempt to make 2 scarves, 2 hats and a pair of socks in 5 weeks flat before Christmas, I knitted my dad some socks.  Now, Dad likes long socks, so to get the most sock possible from my random self-striping German sock yarn (not Regia but similar), I clearly had to go toe-up for the first time ever.  However, Dad also has the family high instep, which makes short-row heels just a bad idea if you ever want to actually get the sock on your foot.  So, me being me, I figured out a way to make a standard top-down heel-flap-and-gusset sock completely backwards.

And me being me being a complete and total muppet, I didn’t write it down before I gave the socks away.

Nowhere.  Nada.  Nix.

So when I tried to use the same method again for my Colinette Jitterbug socks, pain ensued.  With the frogging of the socks and the banging of the head on the coffee shop table.  That kind of pain.

But now, after many many attempts, I have not only reconstructed my original improvised method  for turning the heel, I have also written it down. Hurrah! And tested my own instructions by following them when I made the 2nd sock of the pair.  W00t.  Pass the cheesecake.  Etc.

The instructions now exist on the back of a scratty piece of paper.  Which due to inherent muppet-ness is likely to end up recycled once I finish the socks, with the instructions still on it.  So in the interests of forestalling future concussion, here it is, without (much) further ado:

Purplesteph’s Toe-Up Gusset & Heel-Flap Heel.

Catchy name.

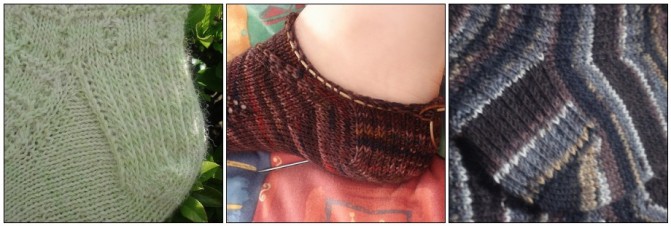
Examples of this heel from l-r: Sadie, Nutbrown not-just-brown socks, Dad's socks. Further pictures & details of all 3 are on my Ravelry projects page.

Examples of this heel from l-r: Sadie, Nutbrown not-just-brown socks, Dad's socks. Further pictures & details of all 3 are on my Ravelry projects page.

These instructions assume that you are making a pair of toe-up socks using 2 circular needles – but the instructions are easily adaptable to dpns or Magic Loop.

Abbreviations:

k = knit; p = purl; sl = slip next stitch purlwise; w&t = wrap and turn (slip next stitch purlwise, bring yarn between needles, slip stitch back so that the yarn has been wrapped around it, then turn work); kfb = knit into front and back of stitch; pfb = purl into front and back of stitch; p2tog = purl next 2 stitches together; ssk = slip next 2 stitches separately knitwise, insert left needle tip into front of both stitches, and knit them together.

Gusset:

When you have knitted the foot of your sock to the desired length (approx. 2 inches less than the total length of your foot to the back of the heel), create a gusset on Needle 2 by increasing on alternate rounds as follows: kfb, k until 2 stitches remain on needle, kfb, k.  (K all Needle 2 stitches in the non-increase rounds. For Needle1, continue in sock pattern the whole of the gusset.)

To work out how many increase rounds you need to do, decide how many rows you will want in your heel flap – 30 is a good number, but you may know that you need more. Also, calculate how many stitches you want for the cap of the heel as follows:

Take the number of sole stitches (before increasing) on Needle 2, and halve it.

  • If the total is an odd number and a half, add 1.5 to it. IE 31 sole stitches, halves to 15.5, + 1.5 = 17.
  • If the total is an even number and a half, add 2.5 to it. IE 33 sole stitches, halves to 16.5, +1.5 = 19.
  • If the total is an even number, add 2 to it. IE 32 sole stitches, halves to 16, + 2 = 18.
  • If the total is an odd number, add 3 to it. IE 30 sole stitches, halves to 15, +3 = 18.

The resulting number is how many stitches you will need to start the heel cap.

The total number of stitches you will need on Needle 2 after completing the gusset increases will be [heelflap stitches] + [heel cap stitches].

Heel Cap:

K half the number of heelflap stitches (Side 1). Slide these stitches onto Needle 1 or a piece of waste yarn while you work the heel cap. From the other end of Needle 2, slide the remaining heelflap stitches (Side 2) onto Needle 1 or a piece of waste yarn. Work heel cap over the remaining central stitches only.

Row 1:  k, kfb, k until 2 stitches remain, w&t

Row 2: sl1, pfb, p until 2 stitches remain, w&t

Row 3: sl1, kfb, k until 3 stitches remain, w&t

Row 4: sl1, pfb, p until 3 stitches remain, w&t

Row5: sl1, kfb, k until 4 stitches remain, w&t

Row 6: sl1, pfb, p until 4 stitches remain, w&t

Continue as set, leaving 1 more stitch unworked at the end of the row each time, until the total number of stitches in the heel cap equals the orignal number of stitches in the sole of the foot.

Next Row:  sl1, k across until 1 stitch remains on left needle, picking up wraps as you go – when you reach a wrapped stitch, slip it knitwise, then pick up the wrap with the point of the left needle. Slip the wrap knitwise, then insert the left needle point into the front of both the stitch and its wrap, and knit them together. Slide the stitches for Side 2 back onto Needle 2 from the other needle or waste yarn. Ssk the last heel cap stitch and first side stitch. Turn work.

Next Row: sl1, p across until 1 stitch remains on left needle, picking up remaining wraps as you go – when you reach a wrapped stitch, slip it purlwise, then pick up the wrap with the point of the left needle. Slip the wrapped stitch back to the left needle, then p2tog with the stitch and its wrap. Slide the stitches for Side 1 back onto Needle 2 from the other needle or waste yarn. P2tog the last heel cap stitch and first side stitch. Turn work.

Heel Flap:

Row 1: [sl1, k1] to last heel cap stitch, ssk with next side stitch, turn.

Row 2: p to last heel cap stitch, p2tog with next side stitch, turn.

Repeat these 2 rows until all side stitches have been incorporated into the heel flap. You should have the same number of stitches on Needle 2 as you had on the sole of the sock, before working the gusset increases. Final Row: sl1, k across all remaining stitches on Needle 2.

Heel is now finished – Ta da!


This week I would like to thank April 6, 2009

Filed under: General yarniness,Sock obsession,Thoughts and Observations — purplesteph @ 12:42 pm
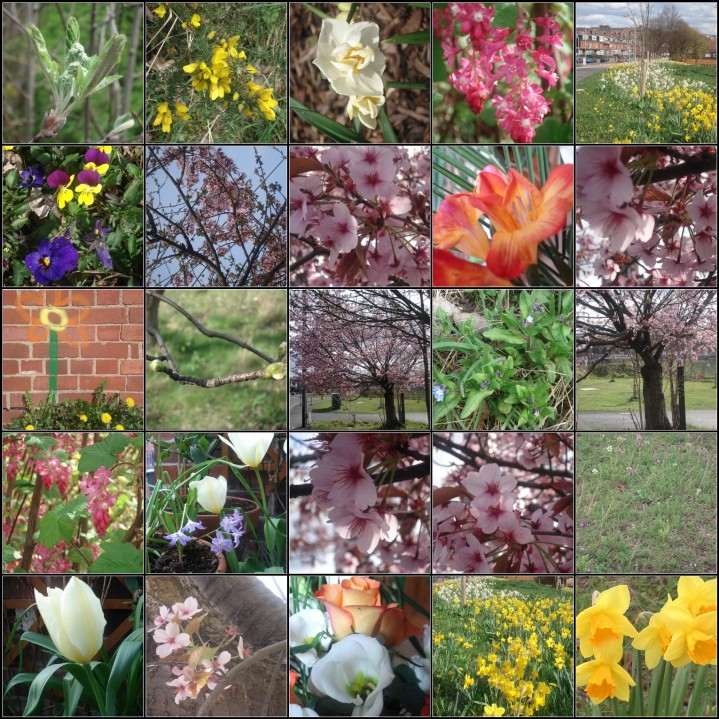
Signs of Spring

All photos taken by me, near my home - within 2 miles of the centre of Leeds. At least half of them are also within 10 feet of major roads. Also included: a shot of a local grass roof (big thanks to the homeowner for letting me inside for a better look); a bouquet my OH gave me on Friday; some local graffiti that caught my eye.

So, this week I would like to thank:

1. The people who planted the flowers

2. The One who makes them grow

3. Lynne and Hazel for being there while I was wrestling with an uncooperative heel on my latest socks (see future post for full gory details)

4. Helen from Ripples Hand Dyed Yarns for the gorgeous Iris yarn:

5. Everyone else on Ravelry who offered me suggestions in the Iris yarn thread.

(Memo: must get to Socktopus next time I’m in London).

6. Ooh – I almost forgot one! Thanks to Boots for bringing out the £1 ethical sock bag! They didn’t know that’s what they were doing, but what does that matter?


…& I’m fee-eeeling good April 2, 2009

Filed under: Uncategorized — purplesteph @ 11:45 am

Yep, this is pretty much how I feel at the moment.

(I keep meaning to blog a couple of rants about the evil bank I worked for a few years ago, that keeps being in the news at the moment for all the wrong reasons.  But I’m way way too cheerful to go into any of that again.  Blogs will follow soon about more socks – I’m working on 2 designs.)


Spring is a state of mind March 15, 2009

Filed under: Dyeing,General yarniness,Sock obsession,Thoughts and Observations — purplesteph @ 4:09 pm

After spending this weekend at a conference centre (which had a swing! all conference centres should have swings!) I arrived home and found that my street looked unfamiliar.  The houses looked prettier, the gardens tidier; there were more green spaces than I remembered, and more trees.

I was pretty puzzled by this until the realisation hit me that I hadn’t walked down my street in that direction in daylight for ages, without carrying heavy shopping bags and being by definition intent on nothing else besides getting home to put them down.

For months I’d been leaving for work in a hurry without looking around me, and arriving back after dark.  At weekends I’d fallen into bad habits, hardly leaving the house at all except when I had somewhere else to be – and was usually again in a hurry.  It wasn’t the neighbourhood that had changed, it was me.

I never make New Year’s Resolutions, and suspect I’d have very little chance of keeping any that I did make.  The darkest and coldest time of the year always seems to me a depressing time to be making big changes.  Although it’s so long since I was in education myself, I’ve never managed to shake off the academic year, because I’ve always either worked at companies or volunteered with organisations connected to schools and education.  So sometimes I make September Resolutions, when the school year starts.  There’s an exciting bite to the breeze, the birds start massing to migrate, and there’s autumn to look forward to.

This time however I’ll be making some Spring Resolutions:

  • Get out more.
  • Look more closely at your local surroundings.
  • Take time to take time.

Every year the blossom catches me by surprise: This year I’m waiting for it.

================================================================================

Quite early in the year I dyed some yarn an optimistic spring-y green – right before the week of the biggest snow that I’ve known in 12 years living in Yorkshire.  The yarn sat and looked at me – it practically laughed at me – as if reproaching me for misplaced optimism.   But I’ll have the last laugh when I knit with it.

Top: Alpaca/Nylon sock yarn, dyed with many many colours of Kool-Aid. Bottom: Alpaca/Nylon sock yarn, optimistically dyed a nice spring green with Lemon & Lime Kool-Aid.

And here are the results of my first ever foray into natural dyeing:

Top: Pure Wool DK dyed with used coffee grounds. Bottom: Pure Wool DK dyed with beetroot. These yarns will be a toy lion eventually.
 

The things you find out… March 10, 2009

Filed under: General yarniness,Odd stuff — purplesteph @ 8:48 am

…while sorting the post.

I picked up a small soft parcel and thought, ‘That’s yarn. But it’s not my yarn. Who else in the building is buying yarn?’

It turns out that one of the other businesses in our building does digital tweaking on Rowan’s photoshoots, because “They always choose funny-looking models with one eye larger than the other.”

Rowan also send them samples of yarn – presumably so they can get the colours on the photos to match the actual yarn, which would be a plus. Unfortunately they have to send all the samples back. Rats. (I had to ask).